以下说明只是简要演练,并非完整指南。启用外部 KMS 时,你应当进一步考虑并研究其安全影响。 KMS 和 Ledger Tendermint 应用目前仍在开发中,细节可能会有所变化。请自行承担风险并谨慎使用。
Tendermint Validator 应用(适用于 Ledger 设备)
你应该可以在 Ledger Live 中找到 Tendermint 应用。
注意:目前你可能需要在 Ledger Live 的设置中启用 developer mode
KMS 配置
在本节中,我们将配置一个 KMS,以使用运行 Tendermint Validator 应用的 Ledger 设备。
配置文件
你可以在这里找到其他配置示例。
- 使用以下内容创建
~/.tmkms/tmkms.toml 文件(请使用合适的 chain_id)
[[validator]]
addr = "tcp://localhost:26658"    # or "unix:///path/to/socket"
chain_id = "gaia-11001"
reconnect = true # true is the default
secret_key = "~/.tmkms/secret_connection.key"

[[providers.ledgertm]]
chain_ids = ["gaia-11001"]
- 编辑
addr,使其指向你的 gaiad 实例。
- 调整
chain-id,使其与你的 .gaia/config/config.toml 设置一致。
provider.ledgertm 目前没有额外参数,但保留这个头部很重要,它用于启用该功能。
插入你的 Ledger 设备,并打开 Tendermint validator 应用。
生成密钥
现在你需要生成 secret_key:
tmkms keygen ~/.tmkms/secret_connection.key
获取验证者密钥
最后一步是获取你将在 gaiad 中使用的验证者密钥。
启动 KMS:
tmkms start -c ~/.tmkms/tmkms.toml
07:28:24 [INFO] tmkms 0.3.0 starting up...
07:28:24 [INFO] [keyring:ledgertm:ledgertm] added validator key cosmosvalconspub1zcjduepqy53m39prgp9dz3nz96kaav3el5e0th8ltwcf8cpavqdvpxgr5slsd6wz6f
07:28:24 [INFO] KMS node ID: 1BC12314E2E1C29015B66017A397F170C6ECDE4A
gaiad。这没有关系,我们会在下一节修复它。
这段输出表明,与该设备关联的验证者密钥是:cosmosvalconspub1zcjduepqy53m39prgp9dz3nz96kaav3el5e0th8ltwcf8cpavqdvpxgr5slsd6wz6f
记下屏幕上显示的验证者公钥。我们会在下一节使用它。
Gaia 配置
你需要通过编辑 .gaia/config/config.toml 来启用 KMS 访问。在这个文件中,修改 priv_validator_laddr,以便在 gaiad 中创建一个监听地址/端口或 unix socket。
例如:
...
# TCP or UNIX socket address for Tendermint to listen on for
# connections from an external PrivValidator process
priv_validator_laddr = "tcp://127.0.0.1:26658"
...
kmsval。你可以把上一节获取到的密钥告诉 gaiad。
gaiad gentx --name kmsval --pubkey {.ValidatorKey}
gaiad。你应该会看到 KMS 已连接并收到签名请求。
当 Ledger 收到第一条消息时,它会请求你确认这些值是否合适。
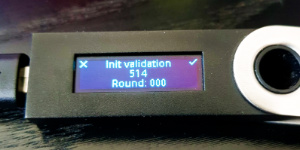 如果高度和轮次正确,请点击右侧按钮。
之后,你会看到 KMS 开始将所有签名请求转发到 Ledger:
如果高度和轮次正确,请点击右侧按钮。
之后,你会看到 KMS 开始将所有签名请求转发到 Ledger:
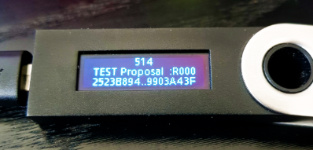
第二张图片的第二行中出现 TEST 一词,是因为这些截图拍摄于预发布版本。一旦该应用在 Ledger 的应用商店中正式发布,这个词就不应该出现。
KMS and Ledger Tendermint app are currently work in progress. Details may vary. Use with care under your own risk.
Tendermint Validator app (for Ledger devices)
You should be able to find the Tendermint app in Ledger Live.
Note: at the moment, you might need to enable developer mode in Ledger Live settings
KMS configuration
In this section, we will configure a KMS to use a Ledger device running the Tendermint Validator App.
Config file
You can find other configuration examples here
- Create a
~/.tmkms/tmkms.toml file with the following content (use an adequate chain_id)
[[validator]]
addr = "tcp://localhost:26658"    # or "unix:///path/to/socket"
chain_id = "gaia-11001"
reconnect = true # true is the default
secret_key = "~/.tmkms/secret_connection.key"

[[providers.ledgertm]]
chain_ids = ["gaia-11001"]
- Edit
addr to point to your gaiad instance.
- Adjust
chain-id to match your .gaia/config/config.toml settings.
provider.ledgertm has no additional parameters at the moment, however, it is important that you keep that header to enable the feature.
Plug your Ledger device and open the Tendermint validator app.
Generate secret key
Now you need to generate secret_key:
tmkms keygen ~/.tmkms/secret_connection.key
Retrieve validator key
The last step is to retrieve the validator key that you will use in gaiad.
Start the KMS:
tmkms start -c ~/.tmkms/tmkms.toml
07:28:24 [INFO] tmkms 0.3.0 starting up...
07:28:24 [INFO] [keyring:ledgertm:ledgertm] added validator key cosmosvalconspub1zcjduepqy53m39prgp9dz3nz96kaav3el5e0th8ltwcf8cpavqdvpxgr5slsd6wz6f
07:28:24 [INFO] KMS node ID: 1BC12314E2E1C29015B66017A397F170C6ECDE4A
cosmosvalconspub1zcjduepqy53m39prgp9dz3nz96kaav3el5e0th8ltwcf8cpavqdvpxgr5slsd6wz6f
Take note of the validator pubkey that appears in your screen. We will use it in the next section.
Gaia configuration
You need to enable KMS access by editing .gaia/config/config.toml. In this file, modify priv_validator_laddr to create a listening address/port or a unix socket in gaiad.
For example:
...
# TCP or UNIX socket address for Tendermint to listen on for
# connections from an external PrivValidator process
priv_validator_laddr = "tcp://127.0.0.1:26658"
...
kmsval. You can tell gaiad the key that we’ve got in the previous section.
gaiad gentx --name kmsval --pubkey {.ValidatorKey}
gaiad. You should see that the KMS connects and receives a signature request.
Once the ledger receives the first message, it will ask for confirmation that the values are adequate.
Click the right button if the height and round are correct.
After that, you will see that the KMS will start forwarding all signature requests to the ledger:
The word TEST in the second picture, second line appears because they were taken on a pre-release version.Once the app has been released in Ledger’s app store, this word should NOT appear.

