

成为验证者
成为验证者有两种方式。- 可以在创世状态中预先设定
- ABCI 应用通过响应 FinalizeBlock 消息来修改 现有的验证者集合。
设置验证者
在设置验证者时,有非常多种配置方式。本指南旨在展示其中一种,即哨兵节点设计。该设计主要用于防御 DDoS。网络布局
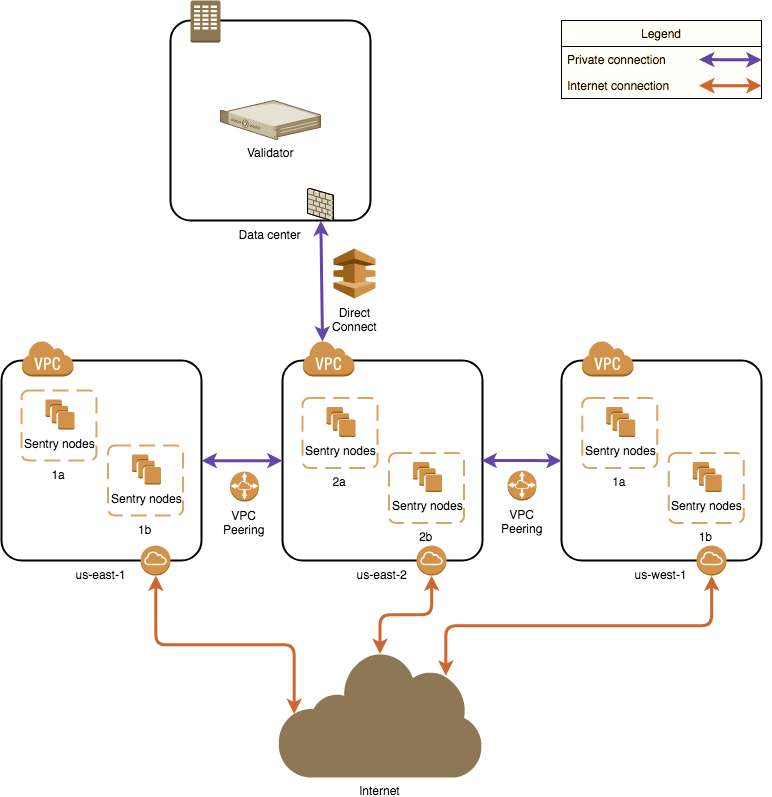 该图基于 AWS;其他云服务商也有类似的网络设计方案。运行节点并不局限于云服务商;你也可以在裸金属系统上运行节点。无论你选择哪种部署方式,整体架构都是相同的。
所建议的网络图类似于企业环境中经典的后端/前端服务分离模式。这里的“后端”是指数据中心中验证者所在的私有网络。数据中心网络可能包含多个子网、防火墙和冗余设备,这些并未在图中详细展示。关键点在于,数据中心允许直接连接到所选的云环境。Amazon AWS 提供 “Direct Connect”,而 Google Cloud 提供 “Partner Interconnect”。这是到云服务商的专用连接(通常直接连接到某个区域中的虚拟私有云实例)。
所有哨兵节点(“前端”)都通过这条私有连接与验证者通信。验证者本身不会暴露用于提供服务的公网 IP 地址。
Amazon 在同一区域内有多个可用区。也可以在其他区域部署哨兵节点。在这种情况下,第二个、第三个及更多区域都需要与验证者节点建立私有连接。这可以通过 VPC Peering(在 Google Cloud 中称为 “VPC Network Peering”)实现。在这种情况下,第二个、第三个及更多区域的哨兵节点会先路由到第一个区域,再通过直连进入数据中心,最终到达验证者。
一种更持久的方案(图中未详细说明)是从数据中心向不同区域建立多条直连。这样就不强制依赖 VPC Peering,尽管它对哨兵节点仍然有帮助。这种方式可以降低依赖单一区域的风险,但成本更高。
该图基于 AWS;其他云服务商也有类似的网络设计方案。运行节点并不局限于云服务商;你也可以在裸金属系统上运行节点。无论你选择哪种部署方式,整体架构都是相同的。
所建议的网络图类似于企业环境中经典的后端/前端服务分离模式。这里的“后端”是指数据中心中验证者所在的私有网络。数据中心网络可能包含多个子网、防火墙和冗余设备,这些并未在图中详细展示。关键点在于,数据中心允许直接连接到所选的云环境。Amazon AWS 提供 “Direct Connect”,而 Google Cloud 提供 “Partner Interconnect”。这是到云服务商的专用连接(通常直接连接到某个区域中的虚拟私有云实例)。
所有哨兵节点(“前端”)都通过这条私有连接与验证者通信。验证者本身不会暴露用于提供服务的公网 IP 地址。
Amazon 在同一区域内有多个可用区。也可以在其他区域部署哨兵节点。在这种情况下,第二个、第三个及更多区域都需要与验证者节点建立私有连接。这可以通过 VPC Peering(在 Google Cloud 中称为 “VPC Network Peering”)实现。在这种情况下,第二个、第三个及更多区域的哨兵节点会先路由到第一个区域,再通过直连进入数据中心,最终到达验证者。
一种更持久的方案(图中未详细说明)是从数据中心向不同区域建立多条直连。这样就不强制依赖 VPC Peering,尽管它对哨兵节点仍然有帮助。这种方式可以降低依赖单一区域的风险,但成本更高。
本地配置
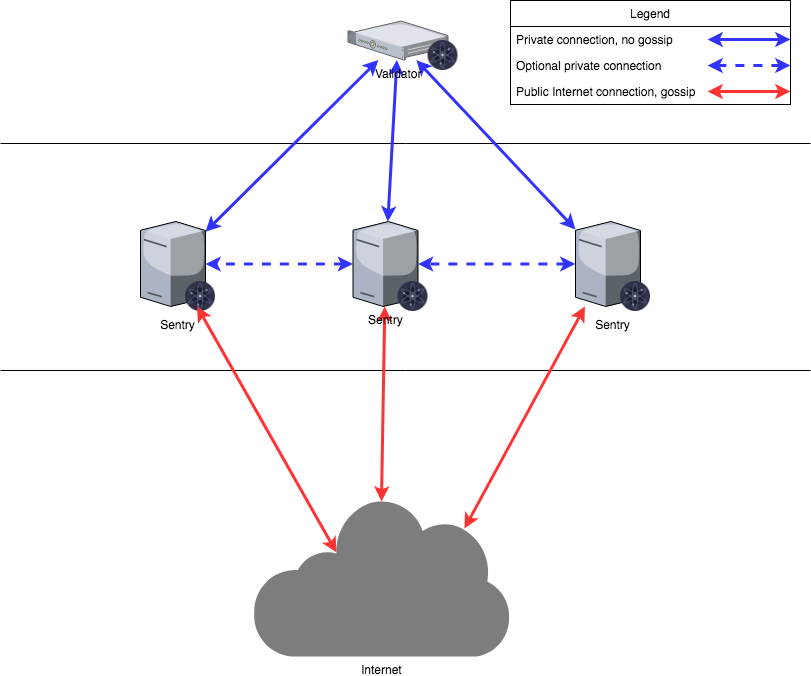 验证者只会与指定的哨兵节点通信;哨兵节点会通过秘密连接与验证者通信,并通过普通连接与网络其余部分通信。哨兵节点之间也可以相互通信。
初始化节点时,
验证者只会与指定的哨兵节点通信;哨兵节点会通过秘密连接与验证者通信,并通过普通连接与网络其余部分通信。哨兵节点之间也可以相互通信。
初始化节点时,config.toml 中有五个参数可能需要修改。
pex:布尔值。用于开启或关闭节点的 peer exchange reactor。当pex=false时,只能通过persistent_peers列表建立连接。persistent_peers:由逗号分隔的nodeID@ip:port列表,用于定义一组预期始终在线的对等节点。首次启动时必须设置它,因为当pex=false时,节点将无法自行加入网络。unconditional_peer_ids:由逗号分隔的 nodeID 列表。无论入站和出站对等节点限制如何,这些节点都会被连接。当哨兵节点拥有完整地址簿时,这一项很有用。private_peer_ids:由逗号分隔的 nodeID 列表。这些节点不会被向网络传播。这是一个重要字段,因为你不希望验证者的 IP 被传播到网络中。addr_book_strict:布尔值。默认情况下,具有可路由地址的节点才会被纳入连接候选。如果关闭该设置(false),则私有网络中的非可路由 IP 地址也可以加入地址簿。double_sign_check_heightint64 高度。加入共识前,向后检查多少个区块以确认该节点的共识投票是否已存在。当该值非零时,如果重启后发现同一共识密钥曾用于为最近double_sign_check_height个区块签名,节点将触发 panic。因此,验证者应先停止状态机,等待若干区块后再重启状态机,以避免 panic。
验证者节点配置
| 配置项 | 设置 |
|---|---|
| pex | false |
| persistent_peers | 哨兵节点列表 |
| private_peer_ids | 无 |
| unconditional_peer_ids | 可选:哨兵节点 ID |
| addr_book_strict | false |
| double_sign_check_height | 10 |
pex=false,这样它就不会向整个网络传播信息。persistent_peers 应设置为你的哨兵节点。private_peer_ids 可以留空,因为验证者并不需要隐藏自己正在与谁通信。对于验证者来说,设置 unconditional_peer_ids 是可选的,因为它们通常不会拥有完整地址簿。
哨兵节点配置
| 配置项 | 设置 |
|---|---|
| pex | true |
| persistent_peers | 验证者节点,可选:其他哨兵节点 |
| private_peer_ids | 验证者节点 ID |
| unconditional_peer_ids | 验证者节点 ID,可选:其他哨兵节点 |
| addr_book_strict | false |
pex=true。哨兵节点的 persistent_peers 应设置为验证者,必要时也可以加入其他哨兵节点。哨兵节点必须确保不会传播验证者的 IP;为此,你需要将验证者的 nodeID 放入 private_peer_ids。unconditional_peer_ids 应包含验证者 ID,必要时也可以加入其他哨兵节点。
注意:设置节点时,不要忘记妥善配置并保护节点的防火墙。更多信息可参考以下链接:
验证者密钥
在设计部署方案时,保护验证者的共识密钥是最重要的考虑因素。节点创建时分配给验证者的密钥称为共识密钥;为了对区块进行投票,它必须始终在线。不建议 仅仅将私钥保存在默认的 JSON 文件(priv_validator_key.json)中。幸运的是,Interchain Foundation 已与一个团队合作,为验证者构建了密钥管理服务器。你可以在这里找到其使用文档;它已被广泛用于生产环境。你并不局限于使用这一工具;还可以使用 HSM。目前并没有唯一被推荐的 HSM 方案。
当前 CometBFT 使用 Ed25519 密钥,这种密钥已在安全行业和 HSM 中得到广泛支持。
Validators are responsible for committing new blocks in the blockchain. These validators participate in the consensus protocol by broadcasting votes which contain cryptographic signatures signed by each validator’s private key. Some Proof-of-Stake consensus algorithms aim to create a “completely” decentralized system where all stakeholders (even those who are not always available online) participate in the committing of blocks. CometBFT has a different approach to block creation. Validators are expected to be online, and the set of validators is permissioned/curated by the ABCI application. Proof-of-stake is not required, but can be implemented on top of CometBFT consensus. That is, validators may be required to post collateral on-chain, off-chain, or may not be required to post any collateral at all. Validators have a cryptographic key-pair and an associated amount of “voting power”. Voting power need not be the same.
Becoming a Validator
There are two ways to become a validator.- They can be pre-established in the genesis state
- The ABCI app responds to the FinalizeBlock message with changes to the existing validator set.
Setting up a Validator
When setting up a validator there are countless ways to configure your setup. This guide is aimed at showing one of them, the sentry node design. This design is mainly for DDoS prevention.Network Layout
The diagram is based on AWS; other cloud providers will have similar solutions to design a network. Running nodes is not limited to cloud providers; you can run nodes on bare metal systems as well. The architecture will be the same no matter which setup you decide to go with.
The proposed network diagram is similar to the classical backend/frontend separation of services in a corporate environment. The “backend” in this case is the private network of the validator in the data center. The data center network might involve multiple subnets, firewalls, and redundancy devices, which are not detailed in this diagram. The important point is that the data center allows direct connectivity to the chosen cloud environment. Amazon AWS has “Direct Connect”, while Google Cloud has “Partner Interconnect”. This is a dedicated connection to the cloud provider (usually directly to your virtual private cloud instance in one of the regions).
All sentry nodes (the “frontend”) connect to the validator using this private connection. The validator does not have a public IP address to provide its services.
Amazon has multiple availability zones within a region. One can install sentry nodes in other regions too. In this case, the second, third, and further regions need to have a private connection to the validator node. This can be achieved by VPC Peering (“VPC Network Peering” in Google Cloud). In this case, the second, third, and further region sentry nodes will be directed to the first region and through the direct connect to the data center, arriving at the validator.
A more persistent solution (not detailed in the diagram) is to have multiple direct connections to different regions from the data center. This way VPC Peering is not mandatory, although still beneficial for the sentry nodes. This overcomes the risk of depending on one region. It is more costly.
Local Configuration
The validator will only talk to the sentries that are provided, the sentry nodes will communicate to the validator via a secret connection and the rest of the network through a normal connection. The sentry nodes do have the option of communicating with each other as well.
When initializing nodes there are five parameters in the config.toml that may need to be altered.
pex:boolean. This turns the peer exchange reactor on or off for a node. Whenpex=false, only thepersistent_peerslist is available for connection.persistent_peers:a comma-separated list ofnodeID@ip:portvalues that define a list of peers that are expected to be online at all times. This is necessary at first startup because by settingpex=falsethe node will not be able to join the network.unconditional_peer_ids:comma-separated list of nodeID’s. These nodes will be connected to no matter the limits of inbound and outbound peers. This is useful when sentry nodes have full address books.private_peer_ids:comma-separated list of nodeID’s. These nodes will not be gossiped to the network. This is an important field as you do not want your validator IP gossiped to the network.addr_book_strict:boolean. By default, nodes with a routable address will be considered for connection. If this setting is turned off (false), non-routable IP addresses, like addresses in a private network, can be added to the address book.double_sign_check_heightint64 height. How many blocks to look back to check existence of the node’s consensus votes before joining consensus. When non-zero, the node will panic upon restart if the same consensus key was used to signdouble_sign_check_heightlast blocks. So, validators should stop the state machine, wait for some blocks, and then restart the state machine to avoid panic.
Validator Node Configuration
| Config Option | Setting |
|---|---|
| pex | false |
| persistent_peers | list of sentry nodes |
| private_peer_ids | none |
| unconditional_peer_ids | optionally sentry node IDs |
| addr_book_strict | false |
| double_sign_check_height | 10 |
pex=false so it does not gossip to the entire network. The persistent peers will be your sentry nodes. Private peers can be left empty as the validator is not trying to hide who it is communicating with. Setting unconditional peers is optional for a validator because they will not have full address books.
Sentry Node Configuration
| Config Option | Setting |
|---|---|
| pex | true |
| persistent_peers | validator node, optionally other sentry nodes |
| private_peer_ids | validator node ID |
| unconditional_peer_ids | validator node ID, optionally sentry node IDs |
| addr_book_strict | false |
pex=true. The persistent peers of a sentry node will be the validator, and optionally other sentry nodes. The sentry nodes should make sure that they do not gossip the validator’s IP; to do this you must put the validator’s nodeID as a private peer. The unconditional peer IDs will be the validator ID and optionally other sentry nodes.
Note: Do not forget to secure your node’s firewalls when setting them up.More information can be found at this link:
Validator keys
Protecting a validator’s consensus key is the most important factor to consider when designing your setup. The key that a validator is given upon creation of the node is called a consensus key; it has to be online at all times in order to vote on blocks. It is not recommended to merely hold your private key in the default JSON file (priv_validator_key.json). Fortunately, the Interchain Foundation has worked with a team to build a key management server for validators. You can find documentation on how to use it here; it is used extensively in production. You are not limited to using this tool; there are also HSMs. There is no single recommended HSM.
Currently CometBFT uses Ed25519 keys which are widely supported across the security sector and HSMs.